When you buy a custom fountain pen, you can usually expect that the nib has been tested and adjusted to work reasonably well right out of the box. However, this is certainly not the case with many, if not most brand name pens (unless you buy from a proprietor that offers such service). It is not uncommon to find oneself a bit disappointed with a nib on a brand new pen, as it is a bit 'scratchy' or perhaps too dry or too wet. To make matters worse, even a nib that is working beautifully can change - get clogged up, go out of alignment from poor use or twisting a nib unit, etc.
For this reason I believe it is a very useful thing for all fountain pen aficionados to make themselves familiar with the basics of cleaning, adjusting/tuning and smoothing of nibs. With a basic skill set, you can fairly easily turn most 'lemons' that you avoid using into star pens that are always in your rotation.
NB: As you read this (assuming of course, that you do), bear in mind that I am writing on what I have found works very well for me, and that as there are many fountain pen users, there are many, many opinions on how things 'ought' to be done, and many of these opinions are as strong as they are utterly unfounded (and beware of those who tell you that a technique is terrible and will only destroy your nibs, and then proceed to offer to fix your nib for profit using a 'special technique' that they will not reveal :-)). In any case, others may disagree on technique, and that's absolutely OK. If you hear of, or find a better way to do things, then by all means do them that way - but please share your tips with your fellow pen lovers rather than just profiting from them!
Tools you will need:
-cheap loupe/magnification system (essential! You must be able to see the tines and tipping very well) You can pick up a cheap loupe many places. I got this one for under $30 at
Lee Valley
-Micromesh paper - very, very fine polishing cloth. I use almost entirely 12,000 grit, only rarely (and only with steel nibs) will I use 8,000. You can also get that many places, but I got these MM discs again, at
LV. I cut them into strips (like the ink stained one above)
-brown bag paper - well, that's pretty much anywhere. The pic shows envelope paper cuz my wife threw out my brown bag paper. See also my comment in 'Fourth' below about brown bag paper.
-paper to test the nib on! Cheapo paper, good paper (useful to see how it performs on both)
First - cleaning: I guess it's kind of a no-brainer that old, used FPs may need some cleaning to work well, but the reality is that even brand new, high end expensive FPs may also need some cleaning in order to work well (may have debris from production or oils etc in the nib/feed assembly).
Most of the time, using a simple weak solution of room-temp water with a bit of dishsoap will do the trick. running this solution through the nib is optimal, using either the converter, or piston, depending on the fill system. In cartridge-only fillers, I often use an empty old cartridge to fill with the soapy water and squeeze it through the nib assembly. In the case of piston fillers, you will need to rinse very well with soapless water afterward to ensure all soap is out of the ink chambre (except Pelikans, whose nib units can easily be unscrewed to facilitate rinsing the ink chambre). Regardless of the fill system, if you fill and empty the pen several times with the soapy water, then with clean water until the soap is gone, you will come out with a clean nib and feed. In the case of old nibs in vintage pens, if this doesn't work, you may need ultrasonic cleaning.
Second - adjusting the flow: This is a little more delicate, and for this, you will need to use the loupe I mentioned above, or whatever other magnification system you can get your hands on. Have a look at the tips of the tines using the loupe, make sure they are more or less reasonably aligned first (Fig.3 shows end-on view of the tipping, while Fig.4 and 5 show the 'writing surface' view (see below)). We'll detail them later. If they are, and the pen is clean, ink it up! Use some kleenex or TP to wick as much ink as possible out of the nib and feed, to make sure that the ink you are working with is flowing from the reservoir (cart/converter/chambre/sac, whatever), and not just residual ink in the feed from filling the nib. This will allow you to assess the flow of ink to the nib and tipping.
Now, try writing with a medium-flow ink (any ink not known to be super-watery or super-dry) on both the cheap and the good paper. If the flow is OK, this part is done. If the flow is too dry, see below. If too wet, see below.
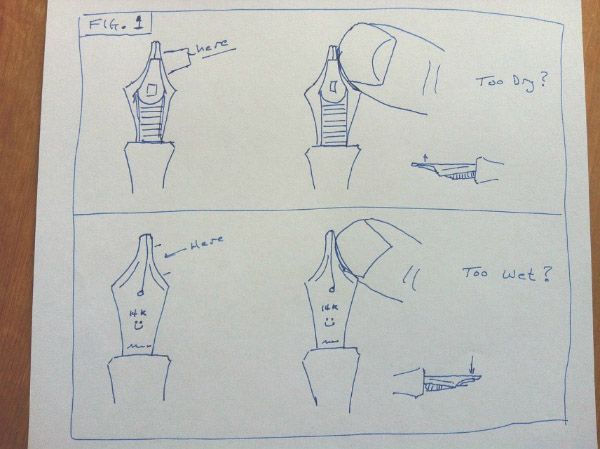
Too dry? (see Fig.1) Carefully use the edge of your thumbnail to gently pry one tine back, away from the feed (though not actually off the feed, only move it a mm or so) then relax. It is important that the point of contact with your nail be a at least a couple of mm back from the tipping itself, so that you are bending the whole tine, not just the tip). Then, do the same with the other tine. Write a few inches of line on paper (see Fig 2 - starting at '1' in the figure) to allow the tines to settle into their new positions, and have a look with the loupe (see Fig.6) . If the tines are grossly out of alignment, adjust them as below. If still too dry, do it gain. If now too wet, see below.
Too wet? (see Fig.1) Carefully use the edge of your thumbnail to gently push one of the tines downward (against the feed by a mm or so), and relax. As above, the point of contact with your nail is at least 2-3mm from the tip. Then, same with the other tine. write an inch or two of ink line to settle the tines (Fig.2 - starting at '1' in the figure), then check with the loupe for approximate alignment (Fig.6). If badly out of alignment, see below. If OK, write a few lines of writing. If too wet, repeat the above. If too dry, see above.
Third - Aligning the tips: This of course, will require the use of magnification. Here, you must realize that the tipping is not usually just a round ball. It most often has a writing surface at an angle to the axis of the pen (see Fig.7). You can see this under magnification looking at the tip of the nib when held sideways. This is the surface that is in contact with the paper when you are writing, and is really the most important surface to assess for alignment. The way to do this is, holding the loupe to your eye, look at the tip of the nib with the nib pointing toward your forehead, feed side up (see Fig.6). This should allow you to see across the writing surface of the tipping, with one tine on the left, the other on the right (see Fig.4 and 5). If they are perfectly aligned here (Fig 5), you are done. If one surface sits higher than the other (Fig.4), you need to adjust the nib. This you can do as described above (adjusting the flow), but with more gentle adjustments, settling the tines each time with a few inches of line on paper (Fig. 2 - but start at '3' in the Figure), rechecking with the loupe each time until the two surfaces are utterly flush, making one writing surface (as in Fig.5).


Fourth - smoothing the tip: Here's where the micromesh comes in. If you have found any scratchiness when writing, it is often because the tips are out of alignment. You may be able to fix this without any smoothing at all - just follow the instructions above. If the tips are aligned, yet the pen is still scratchy (bearing in mind that the finer the pen, the scratchier it will feel, even at its best), then you need to smooth. This is done simply by gently writing (circles, figure eights etc) on a piece of 8,000 or 12,000 micromesh. It should not take long (especially with gold nibs!) - a few seconds at it is usually all it takes. Very poor steel nibs may take longer. Try not to overdo it, as this will then leave sharp edges where the tips meet, potentially making it scratchy again (sorry, but true). The most important surface to work on is the writing surface of the tipping, so hold the nib as though you are writing when you smooth. However, the tipping may benefit from gentle polishing over the surfaces beyond the writing surface too. If the nib is a special nib eg oblique, stub, etc, well... easy enough to figure out where the 'writing surface' is, and smooth that as described above.
* I have revised this post to remove a note about using envelope or brown paper to help smooth the nib, mostly because I just don't bother with that - I haven't found it to be particularly helpful, and the nib will be plenty smooth after using the micro mesh, which is much better material. There are some who have made the rather silly claim that doing circles or figure-eights on brown paper can 'destroy a nib'. This is of course, ludicrous. The worst that it could do it maybe catch some fibre in the nib tip, which is quite easy to remove. Actually, the ones who have made such claims also say such things as "you should never do your own nib work, as you will destroy the nib. Send it to me instead, and I will fix it for a price, but I won't tell you how to do it". Not particularly helpful, to be sure...
NOW - do some writing! - That covers the very basics. Maybe I will go into some of the special situations later (eg 'baby bum' on the tip, causing poor starting...)
I hope that this has been useful to some!
Ken
PS Figures done using my 1945 Parker vacumatic filled with Pilot Blue :-))